AI[]
AI are very helpful in battles where you can't micromanage everything. AI can be little wacky at times, but there is almost every command you can manually do in the AI tab. AI commands are automatically prioritized by how high they are in the chain you build ai botton is at top right
Options[]
The commands are divided into four tabs:
The first tab is for fielding (spawning) ships.
The second tab is for movement commands.
The third tab is for attack commands.
The fourth tab is for everything
Fielding Units[]
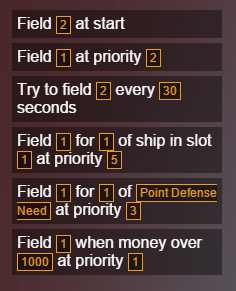
The first tab you see involves Spawning Units. Every time you see "Field", it means "Spawn". A note: The ones with higher priority spawn first.
The first command is simple: spawn this many of this unit when the battle starts. The second command keeps that many of this unit on the field at any given time, as long as resources are available. The third tries to continuously spawn units. The fourth spawns this ship for every X of another ship you have. This keeps up a ratio. (ie spawn 2 for every 1 = 8 that ship and 4 for another). The fifth Spawns ships conditionally. It either does PD or fighter counters.[need stats] The last command spawns a set number of ships when you have over X money at a certain priority.
Movement[]
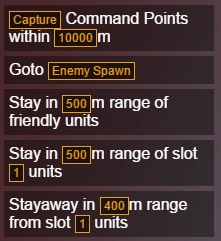
The second tab deals with movement and capturing.
Variable meanings:
- Capture: Capture the closest Command Point
- Spread to: Go to all enemy Command Points. This means that the units with this will split up to capture all Command Points, instead of all units going to one.
- Guard: Capture and guard Command Points. Also guard already captured Command Points.
- Protect: Go to any point being captured by the enemy, similar to Guard.
- Enemy Spawn: Go to Enemy Spawn/Enemy Base. The Enemy Spawn is resembled by a black dotted circle on the other side of the map.
- Friendly Spawn: Go to Team Base. This is where your team's ships spawn. It is resembled by a white dotted circle on your side of the map.
- Enemy Home: Point designated as home by enemy.
- Friendly Home: Point designated as home by your team.
- Enemy Army: Middle of where most of the enemy ships are.
- Friendly Army: Middle of where most friendly ships are.
Attacking[]
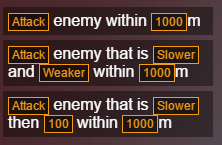
The third tab deals with attacking enemies.
Variable meanings:
- Attack: Attack.
- Flee: Run from.
- Kite: Stay at range and attack.
- Ram: Fly at full speed toward enemy.
- Bomb: Get in range of enemy, fire, then flee.
- Run-by: Go near the enemy, almost a ram.
- Circle: Circle enemy when in range.
- Back-stab: Attack from behind.
- Wiggle: Move towards enemy, but while doing so, move in random directions to throw off targeting.
- Stay at range: Stay at range. Won't move unless being shot at or if another movement command is in place.
- Brawling Value: Unit Health x Unit DPS / Unit Cost.
Misc.[]

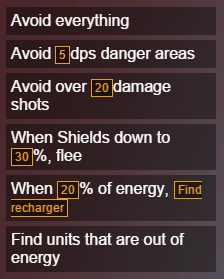
The fourth tab is for everything not in the other tabs that might be useful.
The first command makes the ship avoid all shots and DPS danger areas, which are white squares when you turn on the AI bubble (previously termed 'grid'). The second command is only avoid danger areas. The third is only shots above X damage. The fourth makes it so the ship will flee when its shields are down to X%. The fifth makes the ship look for ships with energy transfer blocks (rechargers) when it is down X% energy. The last is only good for Carriers, so the ship will look for units that have no energy and recharge them.